It is very easy, simple and stress-free to use
an Android Phone as a steady Internet connection for your Computer and other
devices like Smartphones, Tablets etc. Thanks to the release of the Low-Price Quality Android Phones from Tecno, at a very low cost – you can buy a Tecno
Android Phone or any other Android phone and use it like a Wi-Fi Router with the
help of the built-in Wi-Fi Hotspot in the phone.
There
are many ways to connect an Android™ Phone’s data connection to a computer which
includes connecting via a USB cable, via Bluetooth and via Portable
Wi-Fi Hotspot but in this post, we are dealing with the via Portable Wi-Fi
Hotspot method. Although,
using an Android phone as a Wi-Fi Hotspot depends on the model of the Android phone
and at times the Phone’s carrier.
The portable Wi-Fi Hotspot feature
allows you to share your Phone’s data connection with up to 8 wireless devices. Just relax and follow the detailed process below.
Warning:
Using your Android phone’s Wi-Fi Hotspot is data-intensive and will
dramatically reduce the battery life of your phone. I hereby recommend that you
keep your phone plugged in while the wireless hotspot is turned on.
- On your Phone's Home screen, Goto Settings.
- Open Wireless & Networks and click on Tethering & Portable hotspot.
- Choose Portable Wi-Fi Hotspot Settings and you can click on Configure Wi-Fi Hotspot to access the Wi-Fi hotspot settings.
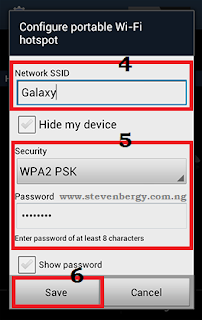
- When configuring the Hotspot, You can change the Network SSID which is the name that other computers or devices see when scanning for Wi-Fi networks.
- Also touch the Security menu to configure the network with WPA2 security, a Pre-Shared Key (PSK). If you touch the WPA2-PSK security option, a password field will be added to the Configure Wi-Fi hotspot dialog. Enter a secure password, note that it must be - at least 8 characters.
- Now, you can Save everything. I'm sure you know how to save :-)
- √ Tick the box in front of □ Portable Wi-Fi hotspot (This turns on the Hotspot). Now your phone's Wi-Fi Hotspot is ready for use.
- By now, your computer, tablet or any other wireless device will see & identify the Wi-Fi connection.
- Now, Click on the internet connection icon on the Taskbar on your computer, and locate your phone’s Wi-Fi name (the one you specified in No.4 above), then click 'Connect'. You will be asked to enter a password, enter the password you chose in No.5 above.
-
CONNECTED !!! Now, you are connected to the Wi-Fi Hotspot of your Android Phone.

You can see that the set-up is easy if you follow it step-by-step. You can use this wi-fi internet connection on any wireless device since your phone's hotspot is now plug'n'play after the first setup. Believe me, With your Android Phone; you don't need any USB Modem. We're finally through with the tutorial - if you have any problem, question or contribution to make about this post. Kindly make use of the comment box provided below, don't forget to share this interesting post with your friends and also stay tuned to StevenBergy.Com.Ng for more upcoming posts about Android Tricks, Blogging Tips and Application Downloads.


No comments:
Post a Comment
Drop Your Contributions, Opinions and Suggestions Here !
Want to be notified when I reply your comment ? Then tick the "Notify Me" box.
Cheers !!!